Fire Pits, Seat Walls & Steps: Designing Integrated Patio Features in Illinois
Last updated: April 8, 2026
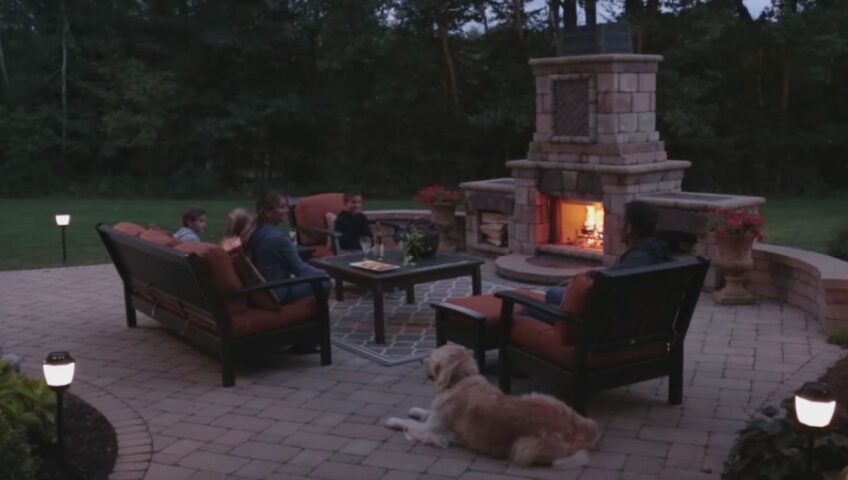
A paver patio is the foundation — but the features built into and around it determine how much you actually use the space. A fire pit turns a patio into a gathering place. A seat wall turns it into an outdoor room. Steps turn it into a cohesive landscape rather than a platform dropped in the middle of your yard. When these elements are designed as integrated components from the beginning, the result is a cohesive, functional outdoor living space. When they’re added as afterthoughts, they look exactly like that. At BLC Yardworks, we design fire pits, seat walls, and steps as part of the overall hardscape plan — not as separate add-ons bolted onto a finished patio. This guide walks through each element in detail. See our full paver patio and hardscaping services or browse our project gallery to see how these features come together in completed Fox Valley projects.
Built-In vs. Freestanding Fire Pits: Which Is Right for Your Patio?
A built-in fire pit, constructed from the same paver or stone material as your patio, delivers a permanent, aesthetically integrated focal point that no portable unit can match. A freestanding fire pit is cheaper upfront but is a different product entirely — portable, temporary, and visually disconnected from the hardscape.
Here is a direct comparison:
| Feature | Built-In Fire Pit | Freestanding (Portable) Fire Pit |
|---|---|---|
| Cost | $1,500–$4,000 installed | $100–$800 (product only) |
| Aesthetic integration | Seamless — matches patio materials | Separate object sitting on the patio |
| Permanence | Permanent — adds to home value | Moveable — no value addition |
| Seating integration | Seat walls designed around it | Chairs arranged around it (changes seasonally) |
| Fuel options | Wood or gas, designed in from the start | Wood primarily (propane attachments available) |
| Heat output | Larger fire area possible | Limited by unit size |
| Maintenance | Ash cleanout (wood) or none (gas) | Same, plus seasonal storage |
For homeowners who are investing in a proper paver patio with the intention of enjoying the space for decades, a built-in fire pit is almost always the right choice. The cost premium over a freestanding unit is small relative to the total project investment, and the visual and functional result is incomparably better.
A built-in fire pit should be planned at the design stage — not added after installation. The patio layout is designed around the fire pit’s location to ensure proper clearances, seating orientation, and traffic flow. Adding a built-in fire pit to an existing patio typically requires cutting and pulling existing pavers, which is more disruptive and expensive than designing it in from the beginning. See our guide on partnering with BLC from concept to completion for how we integrate features in the design phase.
Gas vs. Wood-Burning Fire Pits: Pros, Cons, and Costs
Gas and wood-burning fire pits each have a loyal following among Fox Valley homeowners, and both are valid choices depending on how you prioritize convenience, experience, and cost.
Gas fire pits:
- Pros: Instant on/off operation, no smoke, no ash cleanup, adjustable flame height, can be left unattended more safely, works in wet weather
- Cons: Requires a natural gas line run to the patio (adds cost), monthly utility cost, no wood crackling experience, cannot cook over the flame
- Cost to add gas line: Running a gas line from the home to a patio fire pit typically costs $300–$700 for the gas utility or a licensed plumber. This is in addition to the fire pit construction cost. Gas line work requires a licensed contractor and, in most Fox Valley municipalities, a permit.
- Best for: Homeowners who want to use the fire pit frequently, spontaneously, and with minimal effort — and who don’t place a high value on the wood-fire experience specifically.
Wood-burning fire pits:
- Pros: Traditional campfire experience, crackling sound, natural aroma, can cook over the fire, no utility connection required, lower upfront cost
- Cons: Requires wood purchasing and storage, ash cleanup after each use, smoke may bother neighbors or guests, not usable on high-wind or burn-ban days, fire must be fully extinguished before leaving
- Cost of wood supply: A cord of seasoned firewood in the Fox Valley runs $200–$350 depending on species and delivery. Most homeowners use roughly 1/4 to 1/2 cord per season for recreational fire pit use.
- Best for: Homeowners who love the campfire experience, want to cook outdoors occasionally, and are willing to manage fire responsibly as part of the enjoyment.
Some built-in fire pits are designed as convertible — they can accept a gas insert or be used as wood-burning. This requires planning the structure depth and clearance for gas insert hardware. If you think you might want gas eventually, tell us at the consultation and we will design accordingly.
Seat Wall Design: Height, Cap Options, and Lighting Integration
A paver seat wall does several things simultaneously: it provides permanent seating without furniture clutter, defines the patio perimeter as an “outdoor room,” serves as a low retaining element on a gently sloped yard, and acts as the structural support for integrated lighting.
Height: The standard seat wall height is 18–20 inches above the patio surface. This range is comfortable seating height for most adults. Combined with a cap stone (1.5–2 inches thick), the finished top surface sits at 19.5–22 inches — equivalent to a typical chair or stool seat height. Walls built higher than 22 inches become uncomfortable for sitting and function more as privacy screens than seating walls.
Width: Most seat walls are 12–18 inches wide, which provides a stable base for the cap stone and allows comfortable sitting depth. Wider walls allow decorative plantings or small lanterns to be placed along the top without crowding seated guests.
Cap stone options: The cap stone is the finished top course of the wall — the surface that guests actually sit on. Options include:
- Concrete paver cap: Available in all Unilock and Belgard product lines, matching or complementing the patio field paver. Clean, modern, consistent.
- Natural stone cap: Bluestone, limestone, or granite coping adds a natural, high-end look. Bluestone is particularly popular in the Fox Valley for its durability and slate-like appearance.
- Thermal-finish granite: A premium option with a roughened surface for texture and slip resistance, and available in a range of colors.
Lighting integration: One of the highest-value upgrades to a seat wall is electrical conduit installed in the core of the wall during construction. This allows post-mount lights, uplights, or string light anchors to be wired without surface wires. Post cap lights — installed in the wall cap at regular intervals — are a popular and elegant option. Our landscape lighting team designs the full system to work with the wall design from the beginning. Landscape lighting on a seat-wall project typically adds $2,000–$5,000 depending on scope and fixture selection.
Patio Steps: Rise, Run, Landings, and Design Integration
Patio steps are often the last thing homeowners think about and the first thing guests notice. A grand entrance from the back door down to a beautiful paver patio transforms the entire backyard’s visual hierarchy. Conversely, a poorly designed stair — too steep, too narrow, or visually mismatched — undermines even the most beautiful patio.
Rise and run standards for exterior paver steps:
- Riser height: 6–7.5 inches is the comfortable range for exterior steps. Higher risers feel steep; lower risers cause people to take short, unnatural strides. The standard target is 7 inches.
- Tread depth: Minimum 12 inches, ideally 14–18 inches for patio steps. Deeper treads feel more welcoming and allow room for potted plants or lanterns on the step.
- The 2R + T rule: A general guideline for exterior steps: 2 x riser height + tread depth = 24–26 inches. A 7-inch riser with a 12-inch tread gives 26 — at the comfortable outer limit. A 6-inch riser with a 14-inch tread gives 26 — a very comfortable exterior stair.
- Landing requirements: A minimum 3-foot deep landing is required at the top and bottom of any stair run per standard building guidelines. We typically design 4-foot deep landings at patio-connected stairs to allow the door to swing freely and provide a natural transition area.
Width: Patio steps should never feel narrow. A minimum 4-foot width accommodates two people side by side. Grand entry stairs — the full width of a sliding door or french door opening, or wider — make a powerful design statement and are one of the most-photographed elements in our project gallery.
Material integration: Steps should use the same paver product as the patio surface, with matching or complementary tread and riser materials. Using a contrasting natural stone riser with a paver tread is a popular design detail — it adds visual depth and defines each step clearly, improving safety at dusk.
Connecting walkways: Steps that lead to a paver walkway connecting the patio to the driveway, garage, or side yard create a unified hardscape that replaces disconnected concrete elements. We frequently design complete walkway systems as part of a patio project — replacing the cast concrete path that most homes came with from the builder.
How These Elements Work Together: Integrated Patio Design
The difference between a collection of individual features and a cohesive outdoor living space is integration — designing each element in relation to the others from the beginning, with traffic flow, sightlines, and usability all considered.
Here is how BLC Yardworks approaches the design of a patio with fire pit, seat walls, and steps:
- Establish the anchor point: The fire pit is typically the focal point — placed at the far end of the patio from the house, centered in the space, with a clear sightline from the back door. This creates a visual destination that draws people into the space.
- Design seating orientation: Seat walls are placed to face the fire pit, at a distance of 6–10 feet. This keeps guests at a comfortable warmth and conversation distance. The seat wall creates a natural “room” around the fire pit without requiring furniture.
- Size the patio for the seating: Too often, a patio is designed around the fire pit alone and the surrounding space is inadequate for the number of people the homeowner wants to seat. We work backward from entertainment goals — how many people, what kind of seating — to determine the right overall patio size.
- Place steps for traffic flow: Steps are positioned so the natural path from the back door to the fire pit does not cross through the seating area, creating traffic conflicts. On larger patios, secondary steps may connect different levels or sections of the hardscape.
- Integrate lighting at design time: Conduit paths are planned before any installation begins, so that in-ground uplights, step lights, post cap lights, and string light anchors are cleanly wired without surface runs.
Read more about how the design process works in our article on partnering with BLC from concept to completion, and see design inspiration in our project gallery.
Cost Impact: What Each Feature Adds to Your Project
Understanding the cost of each feature helps you prioritize when working within a budget — and plan a phased approach if you want to add features in future seasons.
| Feature | Typical Cost Range | Notes |
|---|---|---|
| Built-in wood-burning fire pit | $1,500–$3,000 | Size, materials, and complexity vary cost |
| Built-in gas fire pit | $2,500–$4,000 | Includes gas insert; gas line run is additional |
| Gas line to patio (by licensed plumber) | $300–$700 | Separate from fire pit construction cost |
| Seat wall (per linear foot) | $40–$60/linear ft | Includes standard paver cap; natural stone cap adds $5–$15/LF |
| Patio steps (per step, full width) | $200–$400/step | Depends on width and riser/tread material |
| Paver walkway (per linear foot, 4 ft wide) | $40–$80/linear ft | Consistent with patio sq ft pricing |
| Landscape lighting system | $2,000–$8,000 | See our landscape lighting page for scope details |
| Pergola | $5,000–$15,000 | See our custom pergola page for options |
For full context on what a complete patio project costs in the Fox Valley, see our Fox Valley hardscaping cost guide. If budget requires phasing, the base patio and steps are always built in phase one — fire pit and seat walls are the cleanest features to add in a subsequent season.
Frequently Asked Questions
How far should a fire pit be from my house?
The National Fire Protection Association recommends a minimum 10-foot clearance between a fire pit and any structure — including the home, deck, fence, or overhead structure like a pergola. In practice, 12–15 feet is the comfortable design standard, which also happens to provide better seating geometry around the fire. Local ordinances may specify additional restrictions — BLC Yardworks verifies setback requirements as part of every fire pit design.
Can a seat wall double as a retaining wall?
On a gently sloped lot, yes. A seat wall 18–24 inches tall can hold modest grade changes — typically up to 12–18 inches of height differential — while functioning as seating. For larger grade changes, a dedicated retaining wall (with proper drainage and geogrid reinforcement) is needed. We design dual-purpose walls that hold grade efficiently while still meeting comfortable seating height standards. See our complete hardscaping services page for our full retaining wall capabilities.
How do I add string lights to my patio without running cords everywhere?
The cleanest solution is conduit and anchor posts built into the seat wall or edge structures during construction. Anchor posts for string lights are set in concrete or installed in the wall cap at design-specified intervals, with conduit running inside the wall to a junction box. This approach — planned at the design stage — eliminates extension cords entirely. Our landscape lighting team integrates string light systems as part of the overall lighting design. If your patio is already built, surface-mounted conduit anchored to the wall can achieve a similar result, though it is more visible than an in-wall installation.
What is the best fire pit design for entertaining larger groups?
For groups of 8–12 people, a round fire pit 36–48 inches in interior diameter allows everyone seated around it to be within comfortable conversation and warmth distance. A seat wall with an 8–12 foot radius around the fire pit provides seating for this group size without furniture clutter. For larger entertaining groups, a rectangular or elongated fire feature — sometimes called a fire table — combined with surrounding seat walls can accommodate more guests while maintaining the focal point effect. Contact BLC Yardworks to discuss your entertainment goals and we will design around them.
Can I add a fire pit or seat wall to my existing patio?
Yes, though it requires more coordination than building them in originally. Adding a built-in fire pit to an existing patio means cutting and removing pavers in the fire pit footprint, excavating for the fire pit base, and rebuilding the paver surface around it. A seat wall can be added at the patio perimeter more easily — the existing pavers remain, and the wall is built on a separate footing alongside the patio edge. Gas and lighting integration are easiest to add during a retrofit if trenching for conduit is acceptable. We assess existing patios for retrofit feasibility during a free consultation.
About the Author: BLC Yardworks has been installing paver patios and hardscaping for Fox Valley homeowners since 1999. Licensed, insured, and Unilock & Belgard certified. Learn more about BLC Yardworks.